


Suturing is a crucial skill for any medical professional, particularly surgeons. The process of suturing involves stitching up wounds or incisions to promote healing and reduce the risk of infection. In this blog post, we’ll provide a step-by-step guide on how to suture like a surgeon.
Section 1: Preparing for Suturing
- Explain the importance of preparing the patient, the instruments, and the suturing materials
- Discuss the different types of suturing materials and when to use each type
- Explain the different types of suturing needles and their uses
Section 2: Suturing Technique
- Provide a step-by-step guide on how to suture, including positioning the needle, making the first stitch, and tying off the suture
- Discuss different suturing techniques, such as interrupted sutures, running sutures, and mattress sutures
- Explain how to adjust tension on the suture to ensure proper wound closure
Section 3: Aftercare
- Discuss the importance of proper wound care after suturing, including cleaning and dressing the wound
- Explain how to properly remove sutures and when to do so
Understanding the Basics of Suturing
Before diving into the suturing techniques, it’s important to understand what suturing is and why it’s necessary. Suturing involves using a needle and thread to close a wound, which helps to:
- Promote healing by bringing the edges of the wound together
- Minimize scarring
- Reduce the risk of infection
- Restore function and appearance of the skin
Recognizing the types of sutures available is crucial for selecting the right technique for the job. Sutures can be classified as:
- Absorbable Sutures: These are broken down by the body over time and do not require removal.
- Non-Absorbable Sutures: These remain in the body and need to be removed after a period, usually a few days to weeks.
1. Absorbable Suture Materials
| Material | Structure | Strength | T ½ | Uses |
| Gut | Natural | ++ | 5-7 days | Mucosal closure, rare |
| Chromic Gut | Natural | ++ | 10-14 days | Mucosa, perineal |
| Dexon | Braided | +++ | 25 days | Subcuticular closures |
| Vicryl | Braided | ++++ | 28 days | Mucosal closures |
| Maxon | Monofilament | +++++ | 28-36 days | Subcuticular closures |
2. Non-absorbable Suture Materials
| Material | Structure | Strength | Knot security | Uses |
| Silk | Braided | ++ | ++++ | Easy to handle |
| Nylon | Monofilament | +++ | ++ | Common for skin closure |
| Prolene | Monofilament | ++++ | + | High memory, subcuticular pull |
| Dacron | Braided | ++ | ++++ | Good knot security |
Essential Suturing Techniques for Beginners
When starting out, it’s important to practice basic suturing techniques. Here are some essential methods:
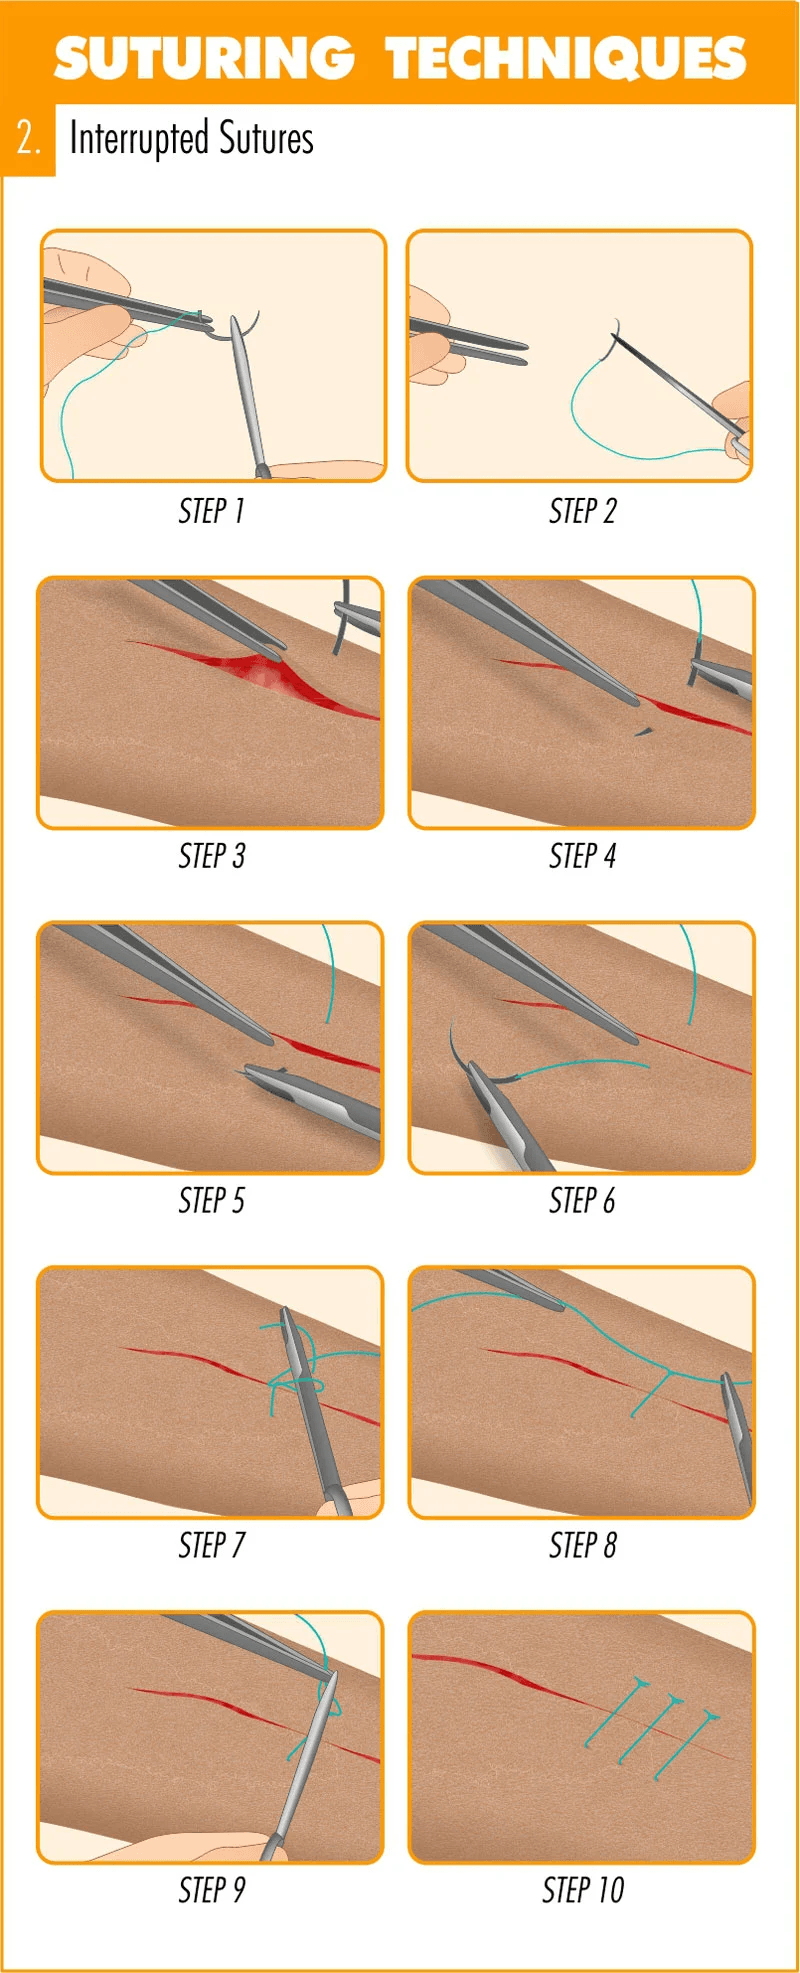
- Simple Interrupted Suture: This is one of the most common suturing techniques. It involves placing individual stitches that can be tied off separately. This technique is useful for closing wounds as it allows for adjustment of tension.
- Running (Continuous) Suture: This technique involves making several stitches with a single thread, which can be faster than the interrupted method. However, careful attention must be paid to tension, as uneven pressure can lead to complications.
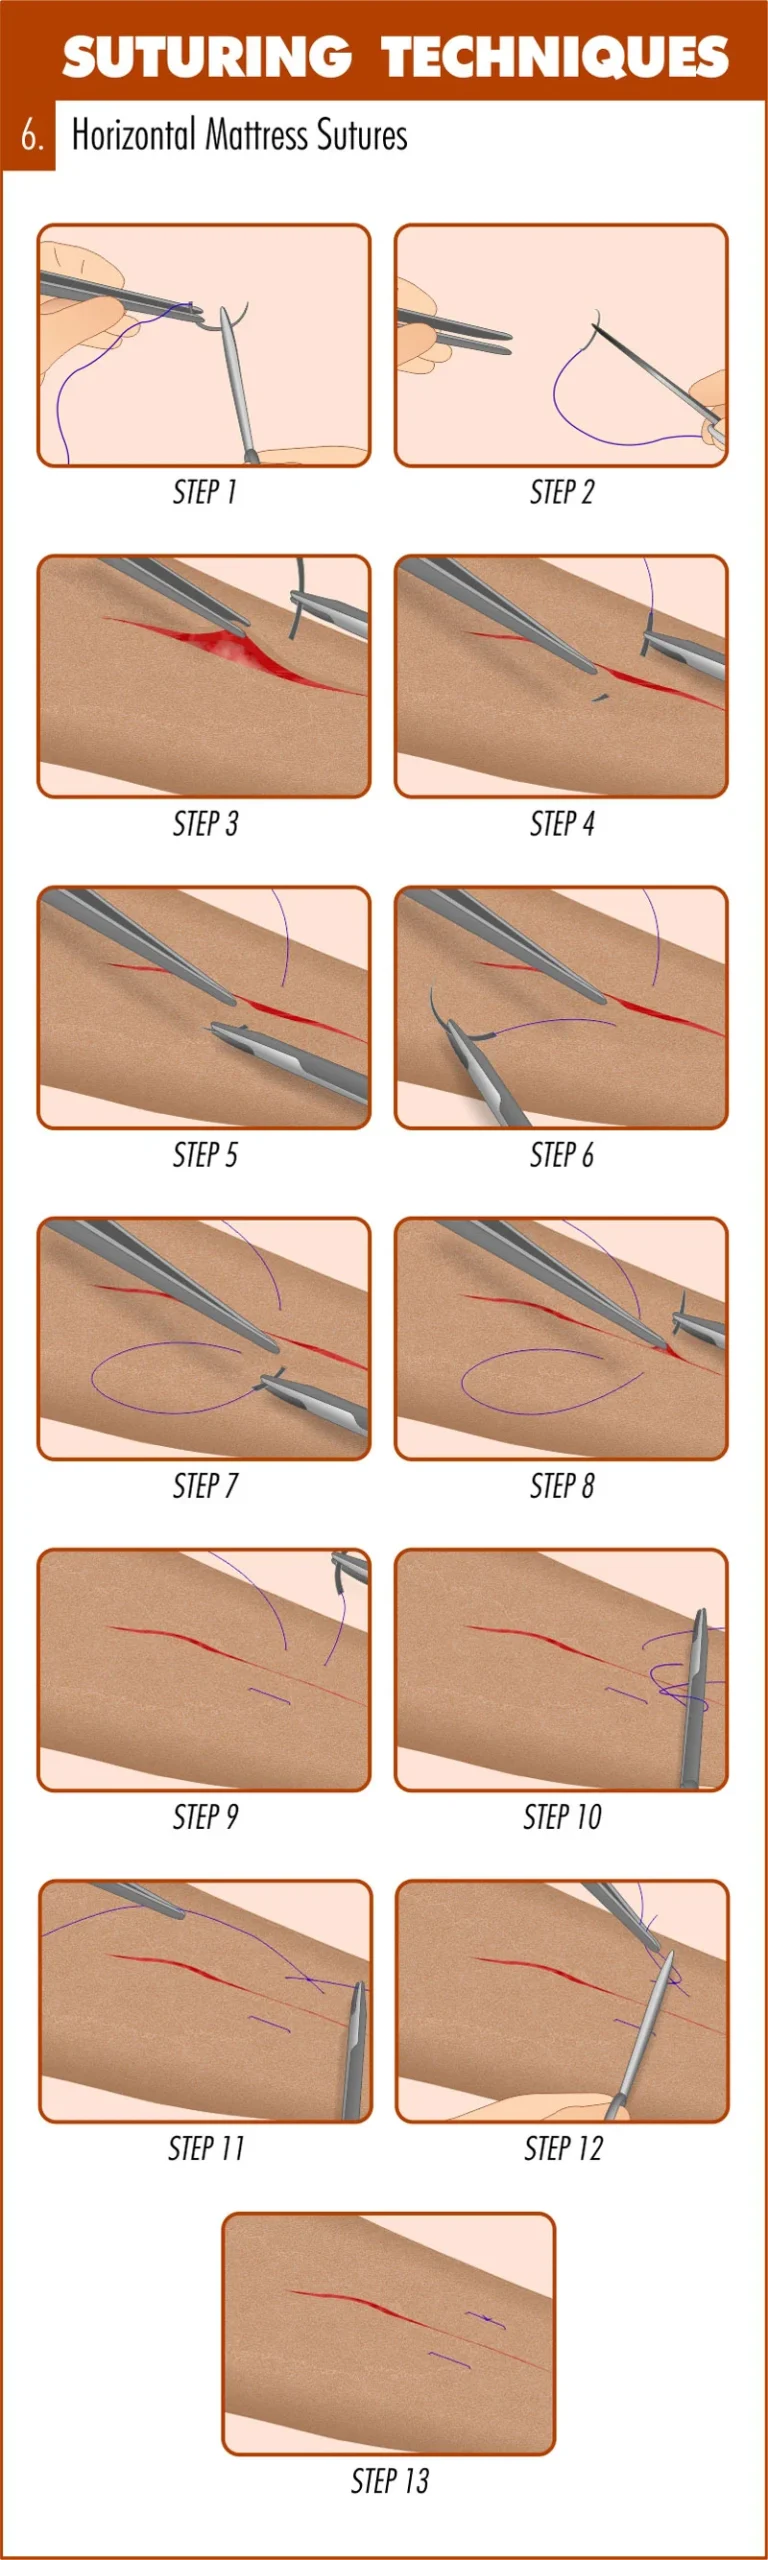
- Mattress Suture: This technique is used to provide greater wound edge eversion, which is crucial for certain types of surgical wounds. The mattress suture can be interrupted or continuous.
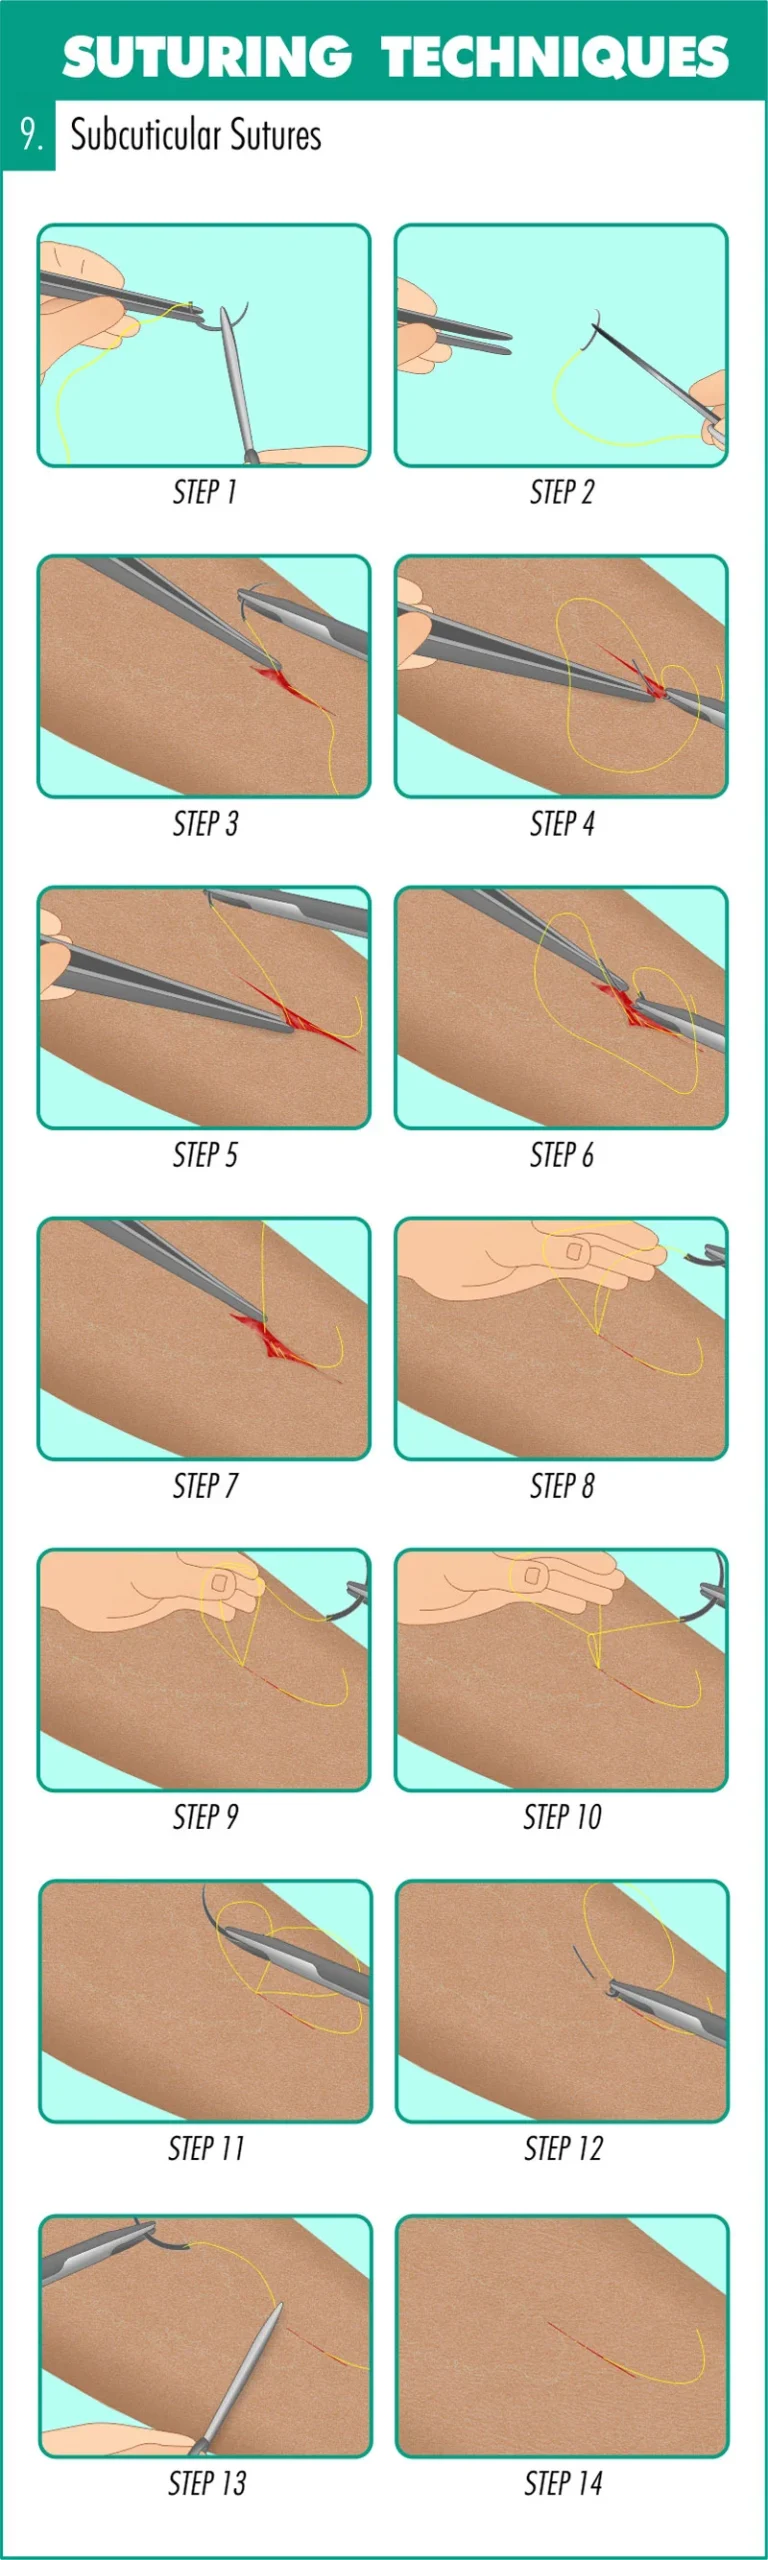
- Subcuticular Suture: Often used for closing skin incisions in a cosmetic way, this technique is placed just beneath the skin to minimize scarring.
Step-by-step guide to placing simple sutures
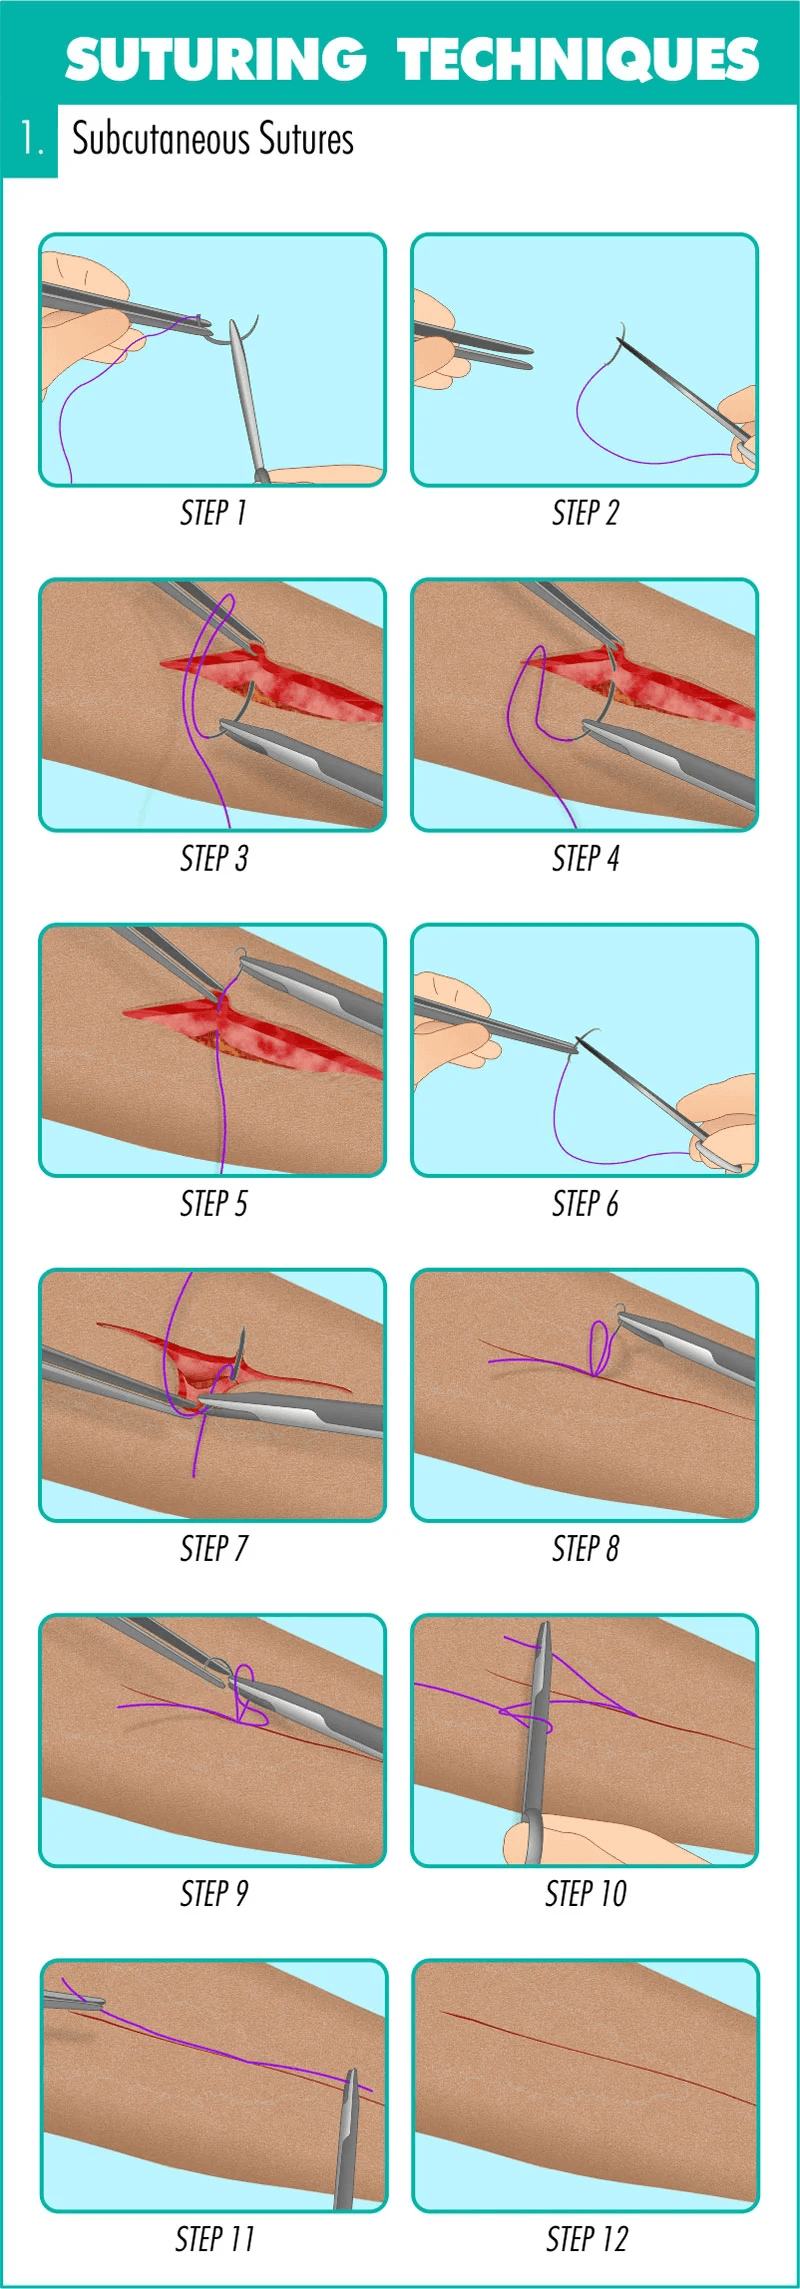
1.How to Place a Subcutaneous Suture
2. How to Place an Interrupted Suture
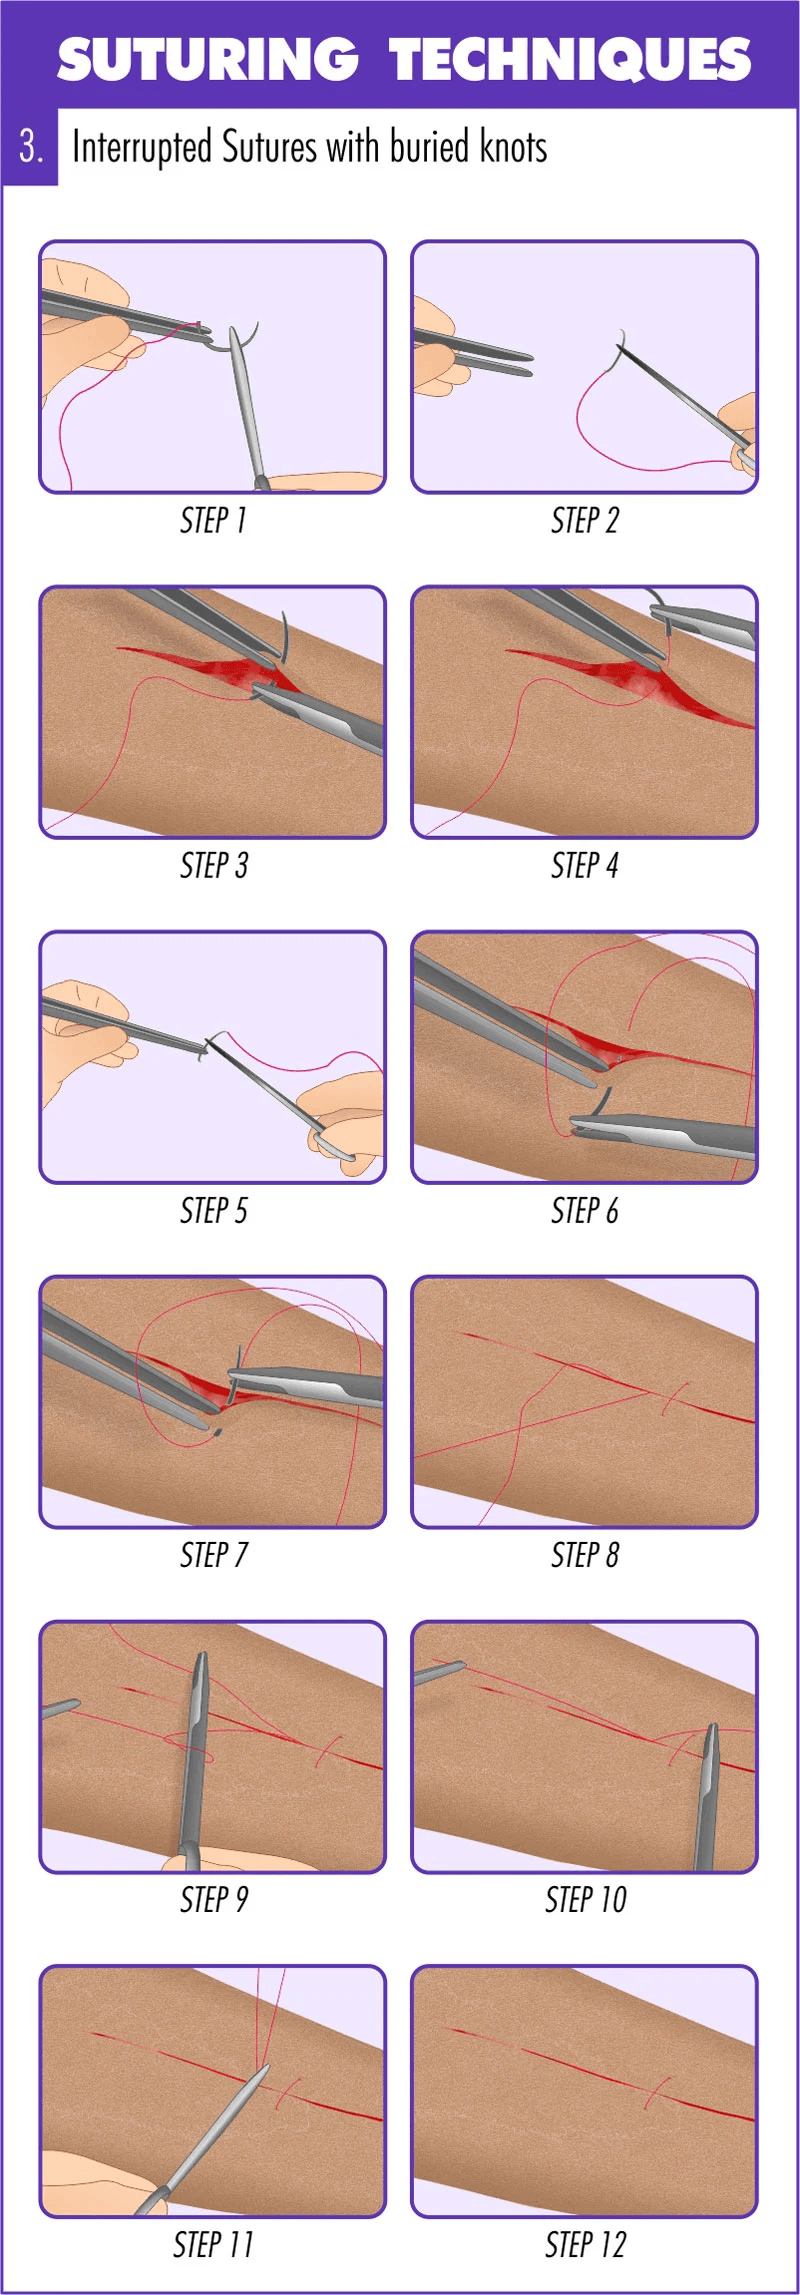
3.How to Place an Interrupted Suture with Buried Knots
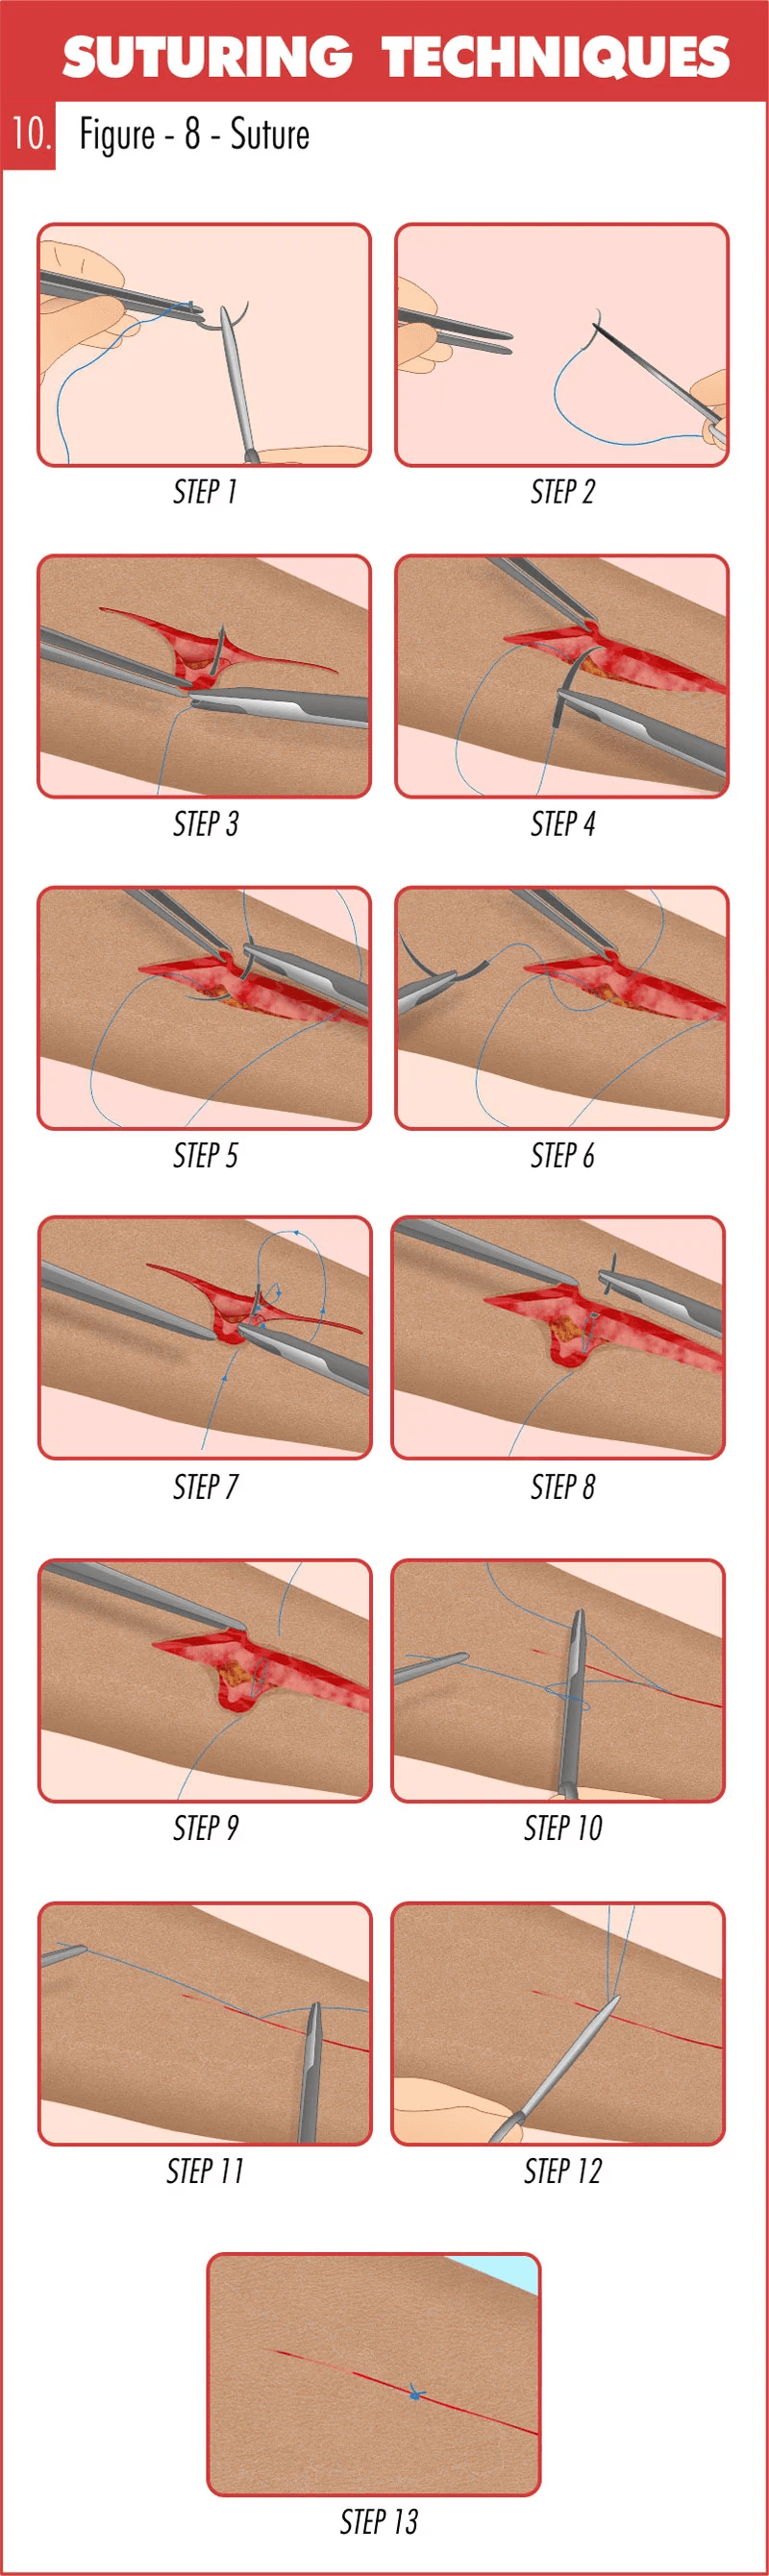
4.How to Place a Figure-of-8 Suture
Step-by-step guide to placing running (continuous) sutures
1.How to Place Continuous (Running) Sutures

2. How to Place a Continuous Interlocking Suture

3.How to Place a Subcuticular Suture
Step-by-step guide to placing mattress sutures
1.How to Place a Horizontal Mattress Suture
2.How to Place a Vertical Mattress Suture

3.How to Place Far and Near Sutures

Other suturing techniques
1.Ligature Sutures
This technique is used to suture tubular structures such as blood vessels in order to stop bleeding or reestablish blood flow.
2.Horizontal Continuous Mattress Sutures
Certain anatomical areas like the retroauricular skin, are prone to wound inversion, and this is an indication for placing horizontal continuous mattress sutures.
3.Horizontal Half Buried Mattress or 3-Corner Sutures
The horizontal half-buried mattress, or 3-corner suture, is used to close flapped or V-shaped wound edges. This technique is also used to better approximate edges of skin of varying texture or thickness. Also, tissue ischemia is reduced by using the 3-corner suture.
4.Relaxation Sutures
This suture technique is used when a wound is expected to create excessive tension. A relaxation suture allows for loosening in order to relieve such tension.
5.Quilting Sutures
This technique is effective at reducing the formation of seroma (swelling or lump in the underlying tissue due to serum accumulation in a localized area). A flap of skin is sutured using multiple stitches to the underlying tendinous expansion sheet (aponeurosis) that normally connects muscle tissue with its movable parts.
6.Retention Sutures
This technique is used to provide strong reinforcement of deep muscle and fasciae in the wall of the abdomen. Retention sutures lessen tension on the primary suture so that wound disruption is limited. The downside is that retention sutures often cause pain and severe discomfort to patients. According to one study, up to 50 percent of patients receiving retention sutures require premature removal due to complaints of pain.
7.Frost Sutures
This suturing technique is used during surgeries of the eyelid. Frost sutures prevent the eyelid (mainly the lower eyelid) from turning outward, known as ectropion.
8.Double-arm Sutures or Cobbler’s Sutures
This technique is preferred by some eye surgeons that desire to vertically or horizontally resect the rectus muscles. The double-arm suture is achieved by using a suture containing a needle at each end.
9.Gély’s Sutures
Similar to the double-arm suture, Gély’s suture uses suture material with a needle at both ends to close intestinal wounds. It is performed using a continuous stitch.
10.Czerny’s Sutures
There are two uses for Czerny’s sutures. The first involves suturing only the mucous membrane of the intestines. The second splits ruptured tendon ends and sutures the other end into the created slit much like a male/female coupling design.
11.Lembert Sutures
The Lembert suture is another technique used in gastrointestinal surgeries. It can be applied as either an interrupted or continuous suture that repairs the collagenous submucosal layer without disturbing the lumen.
Surgical Needles
The surgical needle allows the placement of the suture within the tissue, carrying the material through with minimal residual trauma.
The ideal surgical needle should be rigid enough to resist distortion, yet flexible enough to bend before breaking, be as slim as possible to minimise trauma, sharp enough to penetrate tissue with minimal resistance, and be stable within a needle holder to permit accurate placement.
Commonly, surgical needles are made from stainless steel. They are composed of:
- The swaged end connects the needle to the suture
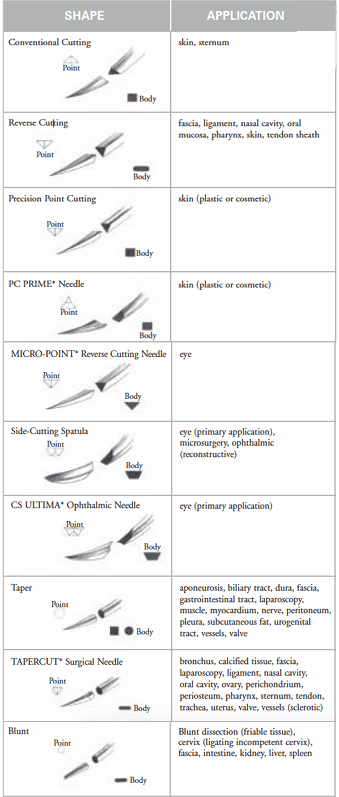
- The needle body or shaft is the region grasped by the needle holder. Needle bodies can be round, cutting, or reverse cutting:
- Round bodied needles are used in friable tissue such as liver and kidney
- Cutting needles are triangular in shape, and have 3 cutting edges to penetrate tough tissue such as the skin and sternum, and have a cutting surface on the concave edge
- Reverse cutting needles have a cutting surface on the convex edge, and are ideal for tough tissue such as tendon or subcuticular sutures, and have reduced risk of cutting through tissue
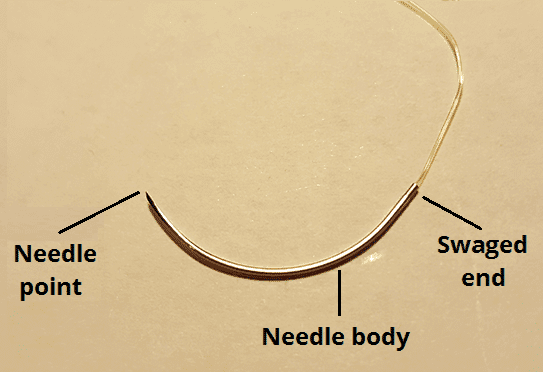
- The needle point acts to pierce the tissue, beginning at the maximal point of the body and running to the end of the needle, and can be either sharp or blunt:
- Blunt needles are used for abdominal wall closure, and in friable tissue, and can potentially reduce the risk of blood borne virus infection from needlestick injuries.
- Sharp needles pierce and spread tissues with minimal cutting, and are used in areas where leakage must be prevented.
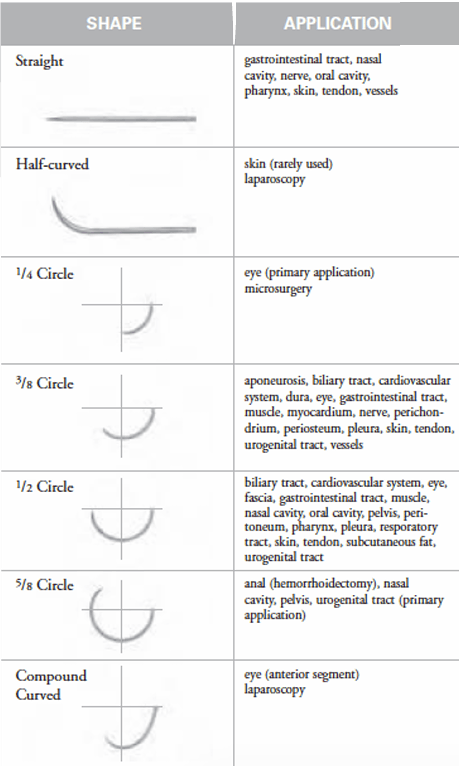
The needle shape vary in their curvature and are described as the proportion of a circle completed – the ¼, ⅜, ½, and ⅝ are the most common curvatures used. Different curvatures are required depending on the access to the area to suture.
1.Classification based on Size and Shape
2.Classification of Needles Based on Shape & Cutting
How to Hold the Instruments ?
Whenever you use sharp instruments, you face the risk of accidentally sticking yourself. Needle sticks are especially hazardous because of the risk of serious infection (hepatitis, human immunodeficiency virus). To prevent needle sticks, get to the habit of using the instruments correctly.
Never handle the suture needle with your fingers.
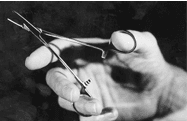
1-Needle Holder:
Place your thumb and ring finger in the holes. When using the needle holder, be sure to grab the needle until you hear the clasp engage, ensuring that the needle is securely held. You grab the needle at its half-way point, with the tip pointing upward. Try not to grab the tip; it will become blunt if grabbed
by the needle holder. Then it will be difficult to pass the tip through the skin.
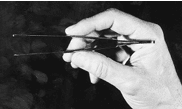
2- Forceps:
Hold the forceps like a writing pensil . The forceps is used to support the skin edges when you place the sutures. Be careful not to grab the skin too hard, or you will leave marks that can lead to scarring.
Ideally, you should grab the dermis or subcutaneous tissue -not the skin- with the forceps, but this technique takes practice. For suturing skin, try to use forceps with teeth, which are little pointed edges at the end of the forceps.
3- Scissors:
Place your thumb and ring finger in the holes. It is best to cut with the tips of the scissors so that you do not accidentally injure any surrounding structures or tissue (which may happen if you cut with the center part of the scissors).

4.Needles
Suture needles should be handled very carefully.
The needle should only be grasped with needle-holders.
Important Considerations for Proper Suturing:
- Aseptic Technique: Always maintain strict aseptic technique during suturing to prevent wound contamination.
- Tissue Handling: Gentle tissue handling minimizes trauma and promotes optimal wound healing.
- Appropriate Needle Size: Choose the appropriate needle size for the specific wound and tissue type to ensure proper wound closure.
- Tension Management: Proper tension on sutures prevents wound edge separation and excessive scarring.
- Knot Security: Ensure secure knots to prevent suture slippage and wound dehiscence.
Tips for suturing
- Practice, Practice, Practice
- Observe how your seniors and colleagues suture, the materials and sizes they choose and develop a set of sutures and a technique that you are comfortable with
- Mount the needle approximately 2/3 from the tip in the needle-holder
- Holding the needle-holders like a pen with the index finger supporting the tip of the needle holders gives better control for fine suturing than holding the handles with finger and thumb
- Eversion of wound edges is best achieved by taking decent sized bites and ensuring that the needle is inserted perpendicular (or even slightly beyond 90o) to the skin
- Try to use absorbable sutures in children wherever possible- they heal very well and removal of non-absorbable sutures can be almost as challenging as the suturing itself!
- Avoid using the forceps to pinch the edges of the wound, rather use them to lift or hook the skin
- Fine debridement of the wound edges to remove traumatised/inflamed/dirty skin promotes healing and produces a more cosmetically pleasing scar
REFERENCES
- UNIVERSITY OF WASHINGTON EMERGENCY MEDICINE INTEREST GROUP. A GUIDE TO THE BASIC SUTURE WORKSHOP. http://depts.washington.edu/uwemig/media_files/EMIG%20Suture%20Handout.pdf[]
- Kromka W, Cameron M, Fathi R. Tie-Over Bolster Dressings vs Basting Sutures for the Closure of Full-Thickness Skin Grafts: A Review of the Literature. J Cutan Med Surg. 2018 Jun 1. 1203475418782152[]
- Kandel EF, Bennett RG. The effect of stitch type on flap tip blood flow. J Am Acad Dermatol. 2001 Feb. 44(2):265-72.[]
- Chan JL, Miller EK, Jou RM, Posten W. Novel surgical technique: placement of a deep tip stitch. Dermatol Surg. 2009 Dec. 35(12):2001-3.[][]
- Wade RG, Wormald JC, Figus A. Absorbable versus non-absorbable sutures for skin closure after carpal tunnel decompression surgery. Cochrane Database Syst Rev. 2018 Feb 1. 2:CD011757[]
- Alam M, Goldberg LH. Utility of fully buried horizontal mattress sutures. J Am Acad Dermatol. 2004 Jan. 50(1):73-6.[]
- Moody BR, McCarthy JE, Linder J, Hruza GJ. Enhanced cosmetic outcome with running horizontal mattress sutures. Dermatol Surg. 2005 Oct. 31(10):1313-6.[]
- Chacon AH, Shiman MI, Strozier N, Zaiac MN. Horizontal running mattress suture modified with intermittent simple loops. J Cutan Aesthet Surg. 2013 Jan. 6(1):54-6.[]
- Eleftheriou LI, Weinberger CH, Endrizzi BT, et al. The Victory stitch: a novel running v-shaped horizontal mattress suturing technique. Dermatol Surg. 2011 Nov. 37(11):1663-5.[]
- Alam M, Posten W, Martini MC, Wrone DA, Rademaker AW. Aesthetic and functional efficacy of subcuticular running epidermal closures of the trunk and extremity: a rater-blinded randomized control trial. Arch Dermatol. 2006 Oct. 142(10):1272-8.[]
- Yag-Howard C. Zipper stitch: a novel aesthetic subcutaneous closure. Dermatol Surg. 2013 Sep. 39(9):1400-2.[]
- Tierney E, Kouba DJ. A subcutaneous corset plication rapidly and effectively relieves tension on large linear closures. Dermatol Surg. 2009 Nov. 35(11):1806-8.
Stories are the threads that bind us; through them, we understand each other, grow, and heal.
JOHN NOORD
Connect with “Nurses Lab Editorial Team”
I hope you found this information helpful. Do you have any questions or comments? Kindly write in comments section. Subscribe the Blog with your email so you can stay updated on upcoming events and the latest articles.


