


Last Updated on July 10, 2026 by Nurseslab.in Editorial Team
Post‑Void Residual (PVR) urine test measures the amount of urine left in the bladder after voiding to assess urinary retention, diagnose bladder dysfunction, and guide treatment decisions.
Introduction
The Post-Void Residual (PVR) Urine Test is a fundamental diagnostic tool in urology and nephrology, used to measure the volume of urine remaining in the bladder after voluntary voiding. This test provides critical information about lower urinary tract function and is instrumental in evaluating a range of urological and neurological disorders. The concept of measuring residual urine dates back to the early 20th century, with initial methods involving catheterisation. Over time, the test has evolved with the advent of non-invasive imaging techniques, notably ultrasound, which have improved both accuracy and patient comfort.
Understanding the principles, procedure, and clinical significance of the PVR urine test is essential for medical professionals involved in the diagnosis and management of urinary tract dysfunctions.
Definition and Overview
The PVR urine test quantifies the amount of urine left in the bladder after an individual has attempted to empty it completely. The measurement is usually expressed in millilitres (mL). An elevated PVR volume may indicate incomplete bladder emptying, which can result from various pathological conditions affecting the lower urinary tract or nervous system.
Historically, PVR assessment was performed exclusively via catheterisation, but modern practice increasingly favours ultrasound-based techniques due to their non-invasive nature and improved safety profile. The test is commonly ordered in both inpatient and outpatient settings, reflecting its broad clinical utility.
Clinical Indications
Reasons for Ordering the Test
The PVR urine test is indicated in several clinical scenarios, primarily when symptoms or risk factors suggest impaired bladder emptying. Common indications include:
- Lower urinary tract symptoms (LUTS) such as frequency, urgency, hesitancy, weak stream, or incomplete emptying
- Urinary incontinence, especially overflow incontinence
- Recurrent urinary tract infections (UTIs)
- Suspected bladder outlet obstruction (e.g., benign prostatic hyperplasia [BPH])
- Evaluation of neurogenic bladder in patients with neurological disorders
- Assessment following pelvic surgery or trauma
- Monitoring of patients with indwelling catheters or intermittent catheterisation
Patient Populations
Certain populations are at increased risk for conditions associated with abnormal PVR volumes:
- Older adults, particularly men with prostatic enlargement
- Patients with diabetes mellitus (due to autonomic neuropathy)
- Individuals with spinal cord injuries or multiple sclerosis
- Women with pelvic organ prolapse or previous pelvic surgeries
- Children with congenital urological anomalies
Symptoms Indicating Need
Key symptoms prompting consideration of the PVR urine test include:
- Difficulty initiating urination
- Straining or prolonged voiding time
- Sensation of incomplete bladder emptying
- Frequent urination with small volumes
- Episodes of urinary retention
Test Procedure
Step-by-Step Description
The PVR urine test can be performed using two main techniques: catheterisation and bladder ultrasound.
Catheterisation Method
- Obtain informed consent and explain the procedure to the patient.
- Ensure aseptic technique to minimise the risk of infection.
- Ask the patient to void as completely as possible.
- Insert a sterile, lubricated catheter into the bladder via the urethra.
- Collect the residual urine that drains through the catheter and measure its volume using a graduated container.
- Remove the catheter and provide appropriate post-procedure care.
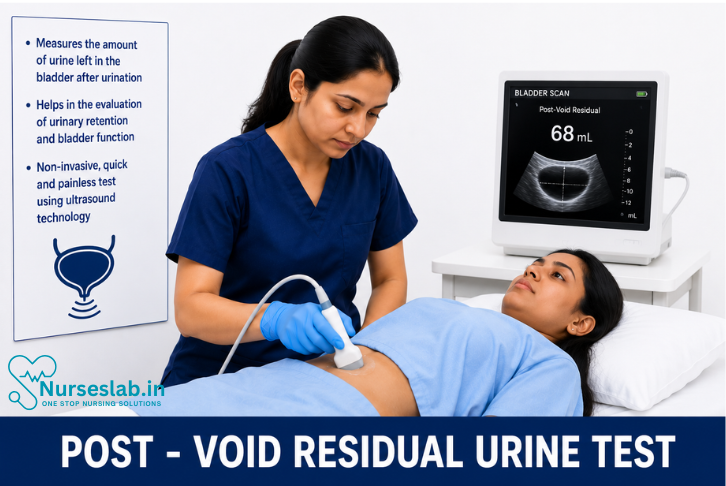
Ultrasound Method
- Explain the procedure and ensure patient comfort.
- Ask the patient to empty their bladder.
- Apply ultrasound gel to the lower abdomen.
- Position the transducer suprapubically and obtain images of the bladder.
- Use the ultrasound’s measurement software to estimate bladder volume based on dimensions (length, width, height).
- Record the calculated residual volume.
Equipment Used
- Catheterisation: Sterile urinary catheter, lubricant, gloves, antiseptic solution, graduated container.
- Ultrasound: Portable bladder scanner or conventional ultrasound machine, transducer, gel.
Interpretation of Results
Normal and Abnormal Values
Normal PVR volumes vary depending on age, sex, and clinical context. In general:
- Adults: A PVR volume of less than 50 mL is considered normal. Volumes between 50–100 mL may be acceptable in older individuals but should prompt further evaluation if persistent.
- Children: Normal values are lower, typically less than 20 mL.
Abnormal values are defined as:
- 50–200 mL: May indicate mild to moderate incomplete emptying.
- Greater than 200 mL: Suggests significant urinary retention and warrants investigation.
Clinical Significance
Elevated PVR volumes are associated with increased risk of urinary tract infections, bladder distension, upper urinary tract damage, and renal impairment. Persistent high residuals may necessitate intervention, ranging from medical management to surgical procedures.
Interpretation in Context
The clinical context is crucial when interpreting PVR results. For instance, a single elevated measurement may be less concerning than consistently high values on repeated testing. Results must be correlated with symptoms, physical examination findings, and other diagnostic tests (e.g., uroflowmetry, urodynamics).
Associated Conditions
Common Urological Conditions
- Benign Prostatic Hyperplasia (BPH): Enlargement of the prostate gland can obstruct urinary flow, leading to high PVR volumes.
- Bladder Outlet Obstruction: Can result from urethral stricture, tumours, or pelvic organ prolapse.
- Detrusor Underactivity: The bladder muscle may fail to contract effectively, causing incomplete emptying.
Neurological Conditions
- Neurogenic Bladder: Resulting from spinal cord injuries, multiple sclerosis, stroke, or diabetic neuropathy, these conditions disrupt normal bladder control.
- Parkinson’s Disease: May affect bladder function due to autonomic nervous system involvement.
Other Associated Disorders
- Urinary Retention: Acute or chronic retention can result in dramatically increased PVR volumes.
- Recurrent UTIs: Incomplete emptying predisposes to infection.
- Renal Impairment: Prolonged high PVR may lead to back-pressure changes affecting the kidneys.
Patient Preparation
General Instructions
Proper patient preparation optimises test accuracy and minimises discomfort:
- Explain the purpose and procedure to the patient, addressing any concerns.
- Instruct the patient to void as completely as possible before the test.
- Advise on hydration status; excessive fluid intake is not necessary unless otherwise indicated.
- Ensure privacy and comfort during the procedure.
Special Considerations
- Paediatric Patients: Use age-appropriate explanations and equipment.
- Elderly Patients: Be mindful of mobility issues and cognitive impairment.
- Patients with Disabilities: Tailor instructions and support according to individual needs.
Risks and Limitations
Potential Complications
- Catheterisation: Risk of urinary tract infection, urethral trauma, discomfort, bleeding.
- Ultrasound: Generally safe; rarely, discomfort from probe pressure.
Accuracy and Limitations
While ultrasound offers a non-invasive alternative, its accuracy may be affected by operator experience, patient body habitus, and bladder shape. Catheterisation provides direct measurement but increases infection risk and patient discomfort.
Limitations include:
- Variability in bladder emptying effort
- Differences in measurement technique
- Potential for false positives/negatives due to timing or equipment calibration
Nursing Care for Patients Undergoing the Post Void Residual (PVR) Urine Test
Nurses are responsible for patient education, preparation, emotional support, performing or assisting with the procedure, monitoring for complications, and ensuring accurate documentation. A patient-centred approach is essential, considering privacy, dignity, and comfort throughout the process.
Pre-Procedure Nursing Care
1. Patient Assessment and Identification
– Verify the patient’s identity using two identifiers (e.g., name and hospital number).
– Review physician’s orders for the PVR test and understand the indication.
– Assess for allergies, especially to latex (if catheterisation is planned).
– Evaluate the patient’s understanding of the procedure and address any misconceptions.
2. Patient Education and Communication
– Explain the purpose, process, and significance of the PVR test in simple, culturally sensitive language.
– Inform the patient about what to expect during the procedure, including sensations that may be experienced.
– Discuss the duration of the test and reassure the patient regarding privacy and confidentiality.
– Encourage questions and provide answers to alleviate anxiety.
3. Preparation of Equipment and Environment
– Gather all required materials: ultrasound machine or sterile catheterisation kit, gloves, antiseptic solution, disposable towels, measuring containers, and documentation tools.
– Ensure the equipment is functioning and calibrated.
– Prepare the environment to ensure privacy (draw curtains, close doors) and comfort (adjust bed height, provide pillows).
– Maintain a calm and reassuring presence.
4. Physical Preparation
– Encourage the patient to void urine as completely as possible before the test.
– Assist with mobility if required, especially for elderly or physically challenged individuals.
– Ensure the patient is wearing appropriate clothing (hospital gown) and is comfortable.
– Maintain hand hygiene and use protective equipment to prevent infection.
During the Procedure
1. Bladder Ultrasonography Method
– Position the patient supine with the lower abdomen exposed.
– Apply ultrasound gel to the lower abdomen.
– Use the ultrasound probe to scan the bladder and measure the residual volume.
– Communicate findings to the patient if appropriate.
– Ensure minimal discomfort and maintain patient dignity throughout.
2. Catheterisation Method
– Perform hand hygiene and don sterile gloves.
– Cleanse the perineal area with antiseptic solution.
– Insert the urinary catheter gently, avoiding trauma.
– Collect the residual urine into a sterile container and measure volume.
– Remove the catheter carefully and provide perineal hygiene.
– Observe for signs of discomfort or complications such as pain, bleeding, or infection.
3. Monitoring and Support
– Monitor the patient for signs of anxiety, pain, or discomfort.
– Provide reassurance and emotional support throughout the procedure.
– Maintain open communication, explaining each step as it occurs.
– Be vigilant for signs of vasovagal reaction, especially during catheterisation.
Post-Procedure Nursing Care
1. Immediate Aftercare
– Assist the patient to clean up and get dressed.
– Ensure the patient is comfortable and safe.
– Dispose of used materials according to hospital protocol.
– Perform hand hygiene.
2. Observation for Complications
– Monitor for signs of urinary tract infection (dysuria, fever, urgency).
– Observe for haematuria, pain, or discomfort post-catheterisation.
– Advise the patient to report any unusual symptoms promptly.
3. Documentation
– Record the time of voiding, method used, and the residual urine volume.
– Document the patient’s response to the procedure and any complications observed.
– Communicate results to the medical team for further management.
4. Patient Education and Follow-up
– Educate the patient on the importance of reporting urinary symptoms.
– Provide guidance on hydration, bladder training, and other relevant lifestyle modifications if indicated.
– Arrange for follow-up appointments or further investigations as required.
REFERENCES
- American Urogynecologic Society. Urodynamic Testing (https://www.augs.org/assets/2/6/Urodynamics.pdf). Last reviewed 2016.
- National Institute of Diabetes and Digestive and Kidney Diseases (U.S.). Urodynamic Testing (https://www.niddk.nih.gov/health-information/diagnostic-tests/urodynamic-testing). Last reviewed 9/2021.
- Urology Care Foundation. What is Urodynamics? https://www.urologyhealth.org/urology-a-z/u/urodynamics
- Yao M, Simoes A. Urodynamic Testing and Interpretation (https://pubmed.ncbi.nlm.nih.gov/32965981/). In: StatPearls. Treasure Island (FL): StatPearls Publishing; August 14, 2023.
Stories are the threads that bind us; through them, we understand each other, grow, and heal.
JOHN NOORD
Connect with “Nurses Lab Editorial Team”
I hope you found this information helpful. Do you have any questions or comments? Kindly write in comments section. Subscribe the Blog with your email so you can stay updated on upcoming events and the latest articles.


