


Last Updated on July 10, 2026 by Nurseslab.in Editorial Team
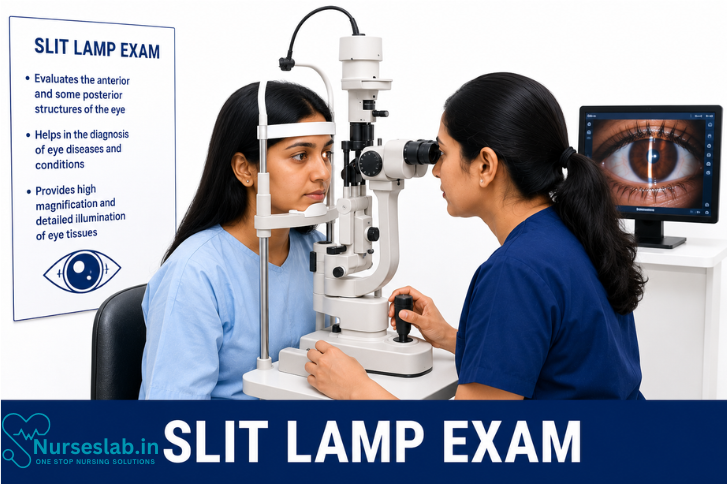
A slit lamp exam provides a detailed, magnified view of the eyes to detect cataracts, corneal injuries, infections, and other eye conditions for accurate diagnosis and treatment.
Introduction
The slit lamp examination is a cornerstone diagnostic procedure in ophthalmology and optometry, enabling clinicians to conduct an in-depth assessment of the anterior and posterior segments of the eye. Utilising a highly specialised biomicroscope, the slit lamp offers magnified and illuminated views of ocular structures, allowing for the identification of subtle abnormalities and facilitating accurate diagnosis and management of a wide range of eye conditions.
Historical Background and Evolution
The slit lamp was first introduced in the early 20th century by Allvar Gullstrand, a Nobel laureate whose innovations revolutionised ophthalmic diagnostics. Over the decades, slit lamp technology has evolved to incorporate advanced optics, digital imaging, and integrated ancillary devices such as tonometers and cameras. Today, slit lamps are indispensable in both routine eye assessments and specialised ophthalmic clinics, supporting a broad spectrum of diagnostic and therapeutic interventions.
Principles and Components of the Slit Lamp
A slit lamp comprises several key components:
- Illumination System: Generates a variable-width, high-intensity beam of light that can be focused into a slit, facilitating detailed examination of transparent and opaque ocular tissues.
- Microscope: Offers adjustable magnification (typically ranging from 6x to 40x), enabling clinicians to scrutinise minute details of the eye’s anatomy.
- Mechanical Arm: Allows precise positioning and movement of the illumination and observation systems.
- Ancillary Attachments: May include applanation tonometers, cameras, and filters (e.g., cobalt blue, red-free, and yellow filters).
The synergy of these components enables comprehensive visualisation and assessment of the eye, from the lids and lashes to the retina.
Indications for Slit Lamp Examination
Slit lamp examination is indicated in a variety of clinical scenarios, including but not limited to:
- Routine eye check-ups
- Evaluation of red eye or ocular discomfort
- Assessment of trauma or foreign bodies
- Diagnosis and monitoring of corneal diseases (e.g., keratitis, dystrophies)
- Investigation of anterior chamber inflammation (e.g., uveitis)
- Detection of cataracts and lens abnormalities
- Glaucoma assessment (with added tonometry and gonioscopy)
- Retinal and vitreous evaluation (with auxiliary lenses)
- Contact lens fitting and follow-up
Preparation for the Slit Lamp Exam
Patient Preparation
Prior to the examination, the patient should be made comfortable and informed about the procedure. The following steps are recommended:
- Explain the purpose and process of the slit lamp exam to allay anxiety.
- Ask the patient to remove spectacles and contact lenses, if applicable.
- Position the patient comfortably at the slit lamp, ensuring their chin and forehead are resting against the appropriate supports.
- Adjust the height of the chin rest so that the outer canthus of the eye aligns with the marker on the slit lamp.
Instrument Preparation
Ensure the slit lamp is clean and functional, with all optical surfaces wiped and the illumination source working optimally. Check that filters and accessory devices are available and functional.
Step-by-Step Procedure of Slit Lamp Examination
1. Initial Observation
Begin with a general inspection of the patient’s face, periocular area, and eyelids for symmetry, swelling, or lesions. Note any abnormal findings such as ptosis, entropion, ectropion, or masses.
2. Examination of Lids, Lashes, and Lacrimal System
Using low magnification and diffuse illumination:
- Inspect the upper and lower lids for inflammation, lesions, or abnormal positioning.
- Examine the eyelashes for signs of madarosis, poliosis, or infestation (e.g., lice).
- Assess the puncta and canaliculi for patency or discharge.
- Inspect the lacrimal gland area and nasolacrimal duct for swelling or tenderness.
3. Conjunctiva and Sclera
Switch to moderate magnification and a broader beam:
- Evaluate the bulbar and palpebral conjunctiva for hyperaemia, chemosis, follicles, or papillae.
- Look for conjunctival lesions such as pinguecula, pterygium, or tumours.
- Assess the sclera for signs of inflammation (e.g., scleritis, episcleritis), thinning, or pigmentation.
4. Cornea
The cornea is scrutinised using a narrow slit beam and higher magnification:
- Assess the surface for clarity, smoothness, and any opacities or irregularities.
- Evaluate the epithelium, stroma, and endothelium for defects, oedema, infiltrates, or guttata.
- Use oblique illumination to highlight subtle lesions and depth of involvement.
- Apply fluorescein dye and use cobalt blue filter to detect epithelial defects, abrasions, or ulcers.
- Perform specular reflection to assess endothelial cell morphology in suspected dystrophies.
5. Anterior Chamber
Employ a narrow, high-intensity slit beam at an angle to the corneal surface:
- Visualise the depth and clarity of the anterior chamber.
- Look for signs of inflammation such as cells and flare (using high magnification and focal illumination).
- Detect abnormal contents like hypopyon, hyphema, or pigments.
- Assess the angle width (Van Herick technique) for glaucoma risk.
6. Iris
Examine the iris for colour, pattern, and surface abnormalities:
- Identify nevi, tumours, atrophy, or transillumination defects.
- Assess for synechiae, pupillary irregularities, or signs of previous inflammation.
- Observe the iris response to light.
7. Lens
Focus the slit beam through the pupil to evaluate the lens:
- Identify opacities, such as nuclear, cortical, or posterior subcapsular cataracts.
- Detect lens displacement (subluxation, dislocation), phacodonesis, or pseudoexfoliation material.
- Assess the integrity of the lens capsule, especially post-surgery.
8. Posterior Segment (with Ancillary Lenses)
To view the vitreous, retina, and optic nerve head, auxiliary lenses (e.g., 90D, 78D, or fundus contact lenses) are used:
- Assess the vitreous for floaters, haemorrhage, or opacities.
- Evaluate the retina for signs of vascular changes, oedema, exudates, or detachments.
- Inspect the optic disc for cupping, pallor, or swelling.
9. Special Techniques and Ancillary Procedures
The slit lamp can be used for various specialised assessments:
- Gonioscopy: Employing a goniolens to evaluate the iridocorneal angle.
- Tonometry: Measuring intraocular pressure using an applanation tonometer attached to the slit lamp.
- Photography: Documenting findings with integrated or attached digital cameras.
- Contact Lens Assessment: Evaluating lens fit, movement, and impact on corneal health.
Interpretation of Findings
Interpretation of slit lamp findings requires clinical acumen and familiarity with normal and pathological ocular anatomy. Common findings include:
- Conjunctival Hyperaemia: Suggests infection, allergy, or irritation.
- Corneal Ulcers or Infiltrates: Indicate infectious or inflammatory processes.
- Anterior Chamber Cells/Flare: Signify uveitis or intraocular inflammation.
- Cataracts: Classified by location and morphology; nuclear sclerosis, cortical spokes, posterior subcapsular opacity.
- Angle Closure: Narrow angles detected by Van Herick technique or gonioscopy suggest risk of glaucoma.
- Iris Abnormalities: Nevi, tumours, or transillumination defects may indicate underlying pathology.
- Posterior Segment Changes: Haemorrhages, exudates, or abnormal disc appearance point to vascular, inflammatory, or glaucomatous conditions.
Findings should be correlated with the patient’s symptoms, history, and other investigations for a comprehensive diagnosis.
Clinical Applications and Case Scenarios
The slit lamp examination is vital in the diagnosis and management of numerous ocular conditions. Some common scenarios include:
- Red Eye: Differentiating conjunctivitis from keratitis, scleritis, or uveitis.
- Contact Lens Complications: Assessing for corneal hypoxia, neovascularisation, or deposits.
- Corneal Trauma: Detecting foreign bodies, abrasions, or lacerations.
- Glaucoma Workup: Evaluating the angle, intraocular pressure, and optic nerve head.
- Diabetic Retinopathy: Identifying microaneurysms, haemorrhages, or neovascularisation during fundus examination.
- Postoperative Assessment: Checking wound integrity, anterior chamber reaction, and lens position following cataract or other intraocular surgeries.
Documentation and Record-Keeping
Accurate documentation of slit lamp findings is essential for continuity of care and medico-legal purposes. Standard records should include:
- Details of each segment examined
- Description of abnormal findings, including location, size, shape, and colour
- Ancillary procedures performed (e.g., tonometry, gonioscopy)
- Photographic documentation where available
- Clinical impression and recommended follow-up
Electronic health records (EHR) and digital imaging have streamlined documentation, improving accuracy and accessibility.
Safety Considerations and Patient Comfort
While the slit lamp examination is generally safe and non-invasive, certain precautions should be observed:
- Ensure proper alignment to avoid neck or back discomfort.
- Minimise exposure to intense light, especially in photophobic patients.
- Use sterile techniques when applying dyes or contact lenses.
- Disinfect surfaces between patients to prevent cross-infection.
- Monitor for allergic reactions to diagnostic dyes (rare).
Patient communication and reassurance are key to alleviating anxiety and ensuring cooperation, particularly in children or those with disabilities.
Limitations and Challenges
Despite its versatility, the slit lamp has certain limitations:
- Restricted field of view, especially for peripheral retinal pathology
- Dependent on patient cooperation and positioning
- Learning curve for interpretation of subtle findings
- Ancillary lenses are required for posterior segment visualisation
- Cannot directly measure intraocular pressure without additional equipment
Continuous training and experience are essential for mastering slit lamp examination and interpretation.
Nursing Care of Patient Undergoing Slit Lamp Examination
Nurses play a crucial role in ensuring the procedure is conducted safely, comfortably, and effectively. Their responsibilities span from pre-procedure preparation to post-examination care, addressing both physical and psychological needs of patients.
Pre-Procedure Nursing Responsibilities
Patient Preparation and Education
Before the slit lamp examination, it is essential for nurses to prepare patients both physically and psychologically. This begins with a clear explanation of the procedure, its purpose, and what the patient can expect during the examination. Using simple, jargon-free language helps alleviate anxiety and fosters cooperation. Patients should be informed about the use of bright lights and the importance of remaining still during the procedure to ensure accurate results.
For certain examinations, mydriatic (pupil-dilating) or anaesthetic eye drops may be administered. The nurse must verify the patient’s identity, check for allergies (especially to medications or latex), and obtain informed consent if required. It is also important to explain the potential side effects of eye drops, such as temporary blurring of vision or sensitivity to light, and to reassure patients that these effects are usually short-lived.
Physical Preparation
The nurse should ensure that the examination area and equipment are clean and functioning properly. The slit lamp should be adjusted to suit the patient’s height and comfort. Disposable chin and forehead rests should be provided for hygiene, and the nurse should demonstrate how to position the head and maintain stillness during the examination.
Instruct the patient to remove spectacles, contact lenses, or any eye cosmetics, as these can interfere with the examination. If the patient has mobility challenges, the nurse should assist with safe transfer to the examination chair and ensure the patient is comfortably seated and supported.
During the Procedure
Patient Support and Safety
Throughout the examination, the nurse should maintain a calm and reassuring presence. For anxious patients, especially children and the elderly, ongoing verbal reassurance and gentle touch can help reduce stress and encourage cooperation. The nurse should remind the patient to keep their eyes open and avoid sudden head movements.
If anaesthetic drops are used, the nurse should monitor for immediate adverse reactions such as stinging, redness, or signs of an allergic response. In cases where the patient has difficulty keeping the eye open, the nurse may assist with gentle eyelid retraction, using sterile techniques to prevent infection.
Assisting the Examiner
The nurse acts as a liaison between the patient and the examiner (ophthalmologist or optometrist). This may involve adjusting the slit lamp, handing over required instruments, or recording observations. Prompt communication of any patient discomfort or concerns to the examiner is vital for patient safety and comfort.
Post-Procedure Nursing Care
Immediate Aftercare
Once the examination is complete, the nurse should assist the patient in safely moving away from the slit lamp. For those who have received mydriatic drops, the nurse should advise patients that their vision may remain blurred and that they may experience increased sensitivity to light for a few hours. It is recommended to provide or suggest the use of sunglasses to minimise discomfort outdoors.
Before the patient leaves, the nurse should reiterate post-procedure instructions. This may include guidance on avoiding rubbing the eyes, recognising symptoms of potential complications (such as redness, pain, or sudden vision loss), and when to seek medical attention. For patients who have received mydriatics, sunglasses may be recommended to reduce discomfort from bright lights. The nurse should also inform the patient of any follow-up appointments or additional tests required.
Documentation
Accurate and comprehensive documentation is an integral part of nursing care. The nurse should record details such as the time and type of drops administered, patient’s response to the procedure, any adverse reactions observed, and the instructions given to the patient post-examination. This ensures continuity of care and legal protection for both the patient and the healthcare facility.
Special Considerations in Nursing Care
Paediatric Patients
Children undergoing slit lamp examination may require special approaches to reduce anxiety and encourage cooperation. The nurse can use toys, storytelling, or parental support to help the child remain calm and still during the procedure. In some cases, gentle restraint may be necessary, always ensuring the child’s comfort and safety.
Geriatric Patients
Elderly patients may have mobility issues, hearing impairment, or cognitive decline, which can affect their ability to follow instructions. The nurse should be patient, speak clearly, and provide physical support as needed. Attention should be given to preventing falls or injuries during movement to and from the examination chair.
Patients with Disabilities
For patients with physical or intellectual disabilities, the nurse should adapt the approach according to individual needs. This may involve the use of additional aids, modified communication techniques, or coordination with caregivers for optimal support.
Common Challenges and Solutions
Anxiety and Non-Cooperation: Calm and empathetic communication, combined with a clear explanation of the procedure, can help reduce patient anxiety and encourage cooperation. Allowing family members to be present or providing distraction techniques (such as music or conversation) can also be effective. Ensuring effective communication throughout the process is paramount. Nurses should observe for signs of discomfort or anxiety, responding promptly with reassurance and clear instructions. Creating a calm and supportive environment helps to build trust and encourages patients to voice any concerns prior to the examination. It is also beneficial to check that any mobility aids or personal belongings are safely stored to
REFERENCES
- Derek W DelMonte, MD Slit Lamp Examination , June 10, 2026. https://eyewiki.org/Slit_Lamp_Examination
- American Academy of Ophthalmology. Slit Lamp Examination (https://eyewiki.aao.org/Slit_Lamp_Examination).
- American Academy of Ophthalmology. What is a Slit Lamp? (https://www.aao.org/eye-health/treatments/what-is-slit-lamp)
- U.S. National Eye Institute. Testing for Dry Eye (https://www.nei.nih.gov/learn-about-eye-health/eye-conditions-and-diseases/dry-eye/testing-dry-eye).
- U.S. National Library of Medicine. Slit-lamp exam (https://medlineplus.gov/ency/article/003880.htm).
Stories are the threads that bind us; through them, we understand each other, grow, and heal.
JOHN NOORD
Connect with “Nurses Lab Editorial Team”
I hope you found this information helpful. Do you have any questions or comments? Kindly write in comments section. Subscribe the Blog with your email so you can stay updated on upcoming events and the latest articles.


